Disappeared yet again due to my grandfather's funeral; apologies. He kinda croaked pretty suddenly and it's just been nothing but a hassle all week on top of all my other things to do. Anyway, moving away from recipes today and learning more about the fundamentals in cooking. It's fine to be able to parrot a dish, but you need to know the basics in order to start building your own dishes without stumbling on constant failures and mishaps.
There's a bit of a saying that I hear from a lot of my chefs that goes "Teach your kid how to make a sandwich and you feed them for a day. Teach them the basics of soups and you have fed them for a lifetime."
I agree with this; soups are inexpensive ways to fill a gut. Once you learn how to make soups from scratch you can pretty much make soups from anything as long as you know the flavor profiles and the proper steps to incorporating the ingredients you have on hand into the soup you have in mind. That being said, here are the bare bones to building a soup.
1. Vegetables and roux.
These are the base for you soup. The stock, the meats, the herbs, and the spices are all important, but your vegetable and roux are what give your soup its fundamental flavor and body. For those that do not know, a roux refers to a blend of fat and flour that is used to thicken the body of a soup. This can be anything from oil and flour to butter and flour. Normally what you do with these two things when a recipe calls for them is sweat the vegetables in oil on low heat to soften them and extract flavors, and follow up with either the spices or roux. When cooking the roux remember how done you want it to be; the darker it is the more it'll show in your end product. This being the case, you will want a lightly cooked, or white/blond roux for clear soups so you don't unintentionally darken it.
2.Main Ingredient and Spices
This is where the main content for your soup comes in. Whether it's potatoes or a vegetable puree, this is when you throw all that in to properly incorporate it with your veg and roux base to absorb the necessary flavors. The spices tend to come in at the end here, as the caramlization of such tend to leave a bitter and undesirable flavor. Pretty simple step; if you have a protein make sure to brown it as doing so will add so much more flavor to your soup as well as lock in moisture for the said protein. No matter how much broth you have a dry piece of meat is kinda bleh. Next is the cous de gras.
3. Stock/Broth
After you get all of your base and main ingredients/spices incorporated with each other you want to throw in your liquid; what makes the soup a soup. There is nothing special to this step; just use what matches with your current array of ingredients. If you have a vegetable soup, use vegetable stock. Beef soup, beef stock, etc. The main tip I have here is to make sure you have your stock heated up in a separate pan ahead of time so you don't have to spend so long waiting it to heat up after throwing it in cold with the rest of the ingredients. Doing so can also shock some ingredients and thus lower the quality of the end result.
4. Finishing Touches/ Garnishes
After you've let your soup go on for the amount of time needed, made sure to keep stirring and keep tasting to adjust seasoning levels (careful with salt in the beginning; your soup will always end up saltier at the end than how it was at the start due to the evaporation of liquid) it's time to throw in your last touches. This is where you lower the temperature of the soup and make sure everything is settled, for you will be adding ingredients such as green onions, cilantro, cream, cheese...whatever doesn't need to be cooked at high temperatures or cooked for very long. Doing so leaves you with undesirable wilted vegetable garnish or broken/curdled dairy. So, get that temp down, throw in whatever is left to be added, and be gentle with it. Many a cook I have known has failed in making a satisfactory product at this last step due to the nature of the last ingredients that tend to be added in most soup recipes.
So there you have it; the bare bones of making soups. There is naturally going to be more to be done with more complex recipes, but just keep these guidelines in mind and you can make some kind of soup out of most anything.
Thursday, October 7, 2010
Friday, October 1, 2010
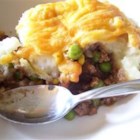
Shepard's Pie
This is pretty much one of those meat and potato lover's type of dishes. It's very nutritious and filling while being simple at the same time. You can do vegan variations with soy protein and non-dairy products too.
- 4 large potatoes, peeled and cubed
- 1 tablespoon butter
- 1 tablespoon finely chopped onion
- 1/4 cup shredded Cheddar cheese
- salt and pepper to taste
- 5 carrots, chopped
- 1 tablespoon vegetable oil
- 1 onion, chopped
- 1 pound lean ground beef
- 2 tablespoons all-purpose flour
- 1 tablespoon ketchup
- 3/4 cup beef broth
- 1/4 cup shredded Cheddar cheese
- Bring a large pot of salted water to a boil. Add potatoes and cook until tender but still firm, about 15 minutes. Drain and mash. Mix in butter, finely chopped onion and 1/4 cup shredded cheese. Season with salt and pepper to taste; set aside.
- Bring a large pot of salted water to a boil. Add carrots and cook until tender but still firm, about 15 minutes. Drain, mash and set aside. Preheat oven to 375 degrees F (190 degrees C.)
- Heat oil in a large frying pan. Add onion and cook until clear. Add ground beef and cook until well browned. Pour off excess fat, then stir in flour and cook 1 minute. Add ketchup and beef broth. Bring to a boil, reduce heat and simmer for 5 minutes.
- Spread the ground beef in an even layer on the bottom of a 2 quart casserole dish. Next, spread a layer of mashed carrots. Top with the mashed potato mixture and sprinkle with remaining shredded cheese.
- Bake in the preheated oven for 20 minutes, or until golden brown.
retrieved October 01, 2010 from http://allrecipes.com//Recipe/shepherds-pie-vi/Detail.aspx
Thursday, September 30, 2010
Black Bean Soup
Another dish that's really awesome in terms of price:output ratio and tastes amazing at the same time. It's a little more effort than making chili, but the time put into it is well worth it. If you college kids are tired of the cereal and ramen diet you could try this out.
Tuesday, September 28, 2010
Rough week/Grilled Eel
Ugh, had to disappear again because of some school and work nonsense. I've had nothing but boatloads of homework on top of looking for some more work and taking care of some school legal business. Sorry about that. Today it's fairly simple; grilled eel. I'm sure a good deal of people in America don't know how this should be prepared, and a friend of mine asked me the other day how I'd do it after his brother caught a huge one in Hawaii. Eel has a very meaty texture and tastes more like an animal from the land rather than something from the sea. That might be appealing to some people. Anyhow, here's the recipe.
And that's all there is to it. There's a lot of other ways to prepare eel, but this is one of my favorites as I'm still familiarizing myself with the Japanese style of doing so.

- 2 pounds eel
- 4 cloves garlic
- 2 tablespoons olive oil
- 1 tablespoon balsamic vinegar
- 1/2 a bay leaf per piece eel
And that's all there is to it. There's a lot of other ways to prepare eel, but this is one of my favorites as I'm still familiarizing myself with the Japanese style of doing so.
Tuesday, September 21, 2010
Frittata
In my opinion this is the king of egg breakfasts. Omelettes are cool but frittatas are just too amazing. It's like a breakfast pizza that doesn't suck (I know some of you have had that shit back in high school. You know the eggs, cheese, bacon pizza that tasted like day old scrap food.) Anyway, this recipe is my favorite but frittatas are extremely malleable and you can put whatever you want in them.
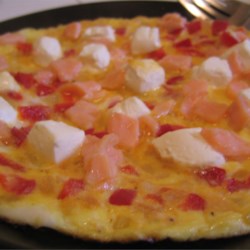
Smoked Salmon Frittata
Ingredients
- 4 tablespoons olive oil
- 1/4 medium onion, chopped
- salt and pepper to taste
- 4 ounces pepper smoked salmon
- 8 black olives, chopped
- 6 eggs
- 2 tablespoons milk
- 2 tablespoons heavy cream
- 1/2 (8 ounce) package cream cheese, cubed
Directions
- Preheat the oven to 350 degrees F (175 degrees C).
- Heat olive oil in an 8 inch oven-safe skillet over medium heat. Add onion, and season with a little salt and pepper. Cook, stirring until translucent. Add the salmon and olives; cook and stir briefly to release the flavors.
- In a medium bowl, whisk together the eggs, milk and cream. Pour over the salmon and onion, and stir gently. Scatter cubes of cream cheese over the top. Cook over medium heat without stirring, until the edges appear firm.
- Place the skillet in the preheated oven, and bake for 20 minutes, or until nicely browned and puffed. Flip onto a serving plate, and cut into wedges to serve.
Retrieved September 21, 2010 from http://allrecipes.com/Recipe/Smoked-Salmon-Frittata/Detail.aspx
Monday, September 20, 2010
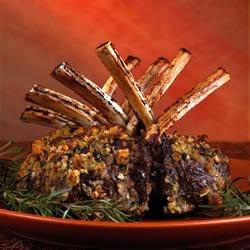
I'm back/Rack of Lamb
Kinda disappeared for a few days due to having to move. Sorry about that, guys. Anyway, today's recipe is rack of lamb. It's kinda funny how many people haven't had lamb rack before despite how damn good it is. Best enjoyed medium rare, but all of you silly mongrels that don't like blood can have it medium well >:(. Again, not my recipe, but this one is really really good. Word of warning; if you don't like gamey flavors you might not like this so much.
Retrieved September 20, 2010 from http://allrecipes.com//Recipe/roasted-rack-of-lamb/Detail.aspx
- 1/2 cup fresh bread crumbs
- 2 tablespoons minced garlic
- 2 tablespoons chopped fresh rosemary
- 1 teaspoon salt
- 1/4 teaspoon black pepper
- 2 tablespoons olive oil
- 1 (7 bone) rack of lamb, trimmed and frenched
- 1 teaspoon salt
- 1 teaspoon black pepper
- 2 tablespoons olive oil
- 1 tablespoon Dijon mustard
Directions
- Preheat oven to 450 degrees F (230 degrees C). Move oven rack to the center position.
- In a large bowl, combine bread crumbs, garlic, rosemary, 1 teaspoon salt and 1/4 teaspoon pepper. Toss in 2 tablespoons olive oil to moisten mixture. Set aside.
- Season the rack all over with salt and pepper. Heat 2 tablespoons olive oil in a large heavy oven proof skillet over high heat. Sear rack of lamb for 1 to 2 minutes on all sides. Set aside for a few minutes. Brush rack of lamb with the mustard. Roll in the bread crumb mixture until evenly coated. Cover the ends of the bones with foil to prevent charring.
- Arrange the rack bone side down in the skillet. Roast the lamb in preheated oven for 12 to 18 minutes, depending on the degree of doneness you want. With a meat thermometer, take a reading in the center of the meat after 10 to 12 minutes and remove the meat, or let it cook longer, to your taste. Let it rest for 5 to 7 minutes, loosely covered, before carving between the ribs.
Thursday, September 16, 2010
Chili!
I think that most people shouldn't go without knowing how to make good chili; it's even possible to make vegan chili so that applies to everyone. This post won't be vegan though, so sorry for those out there who are.
Chili is fairly inexpensive to make and lasts for so many servings, so it was basically what I lived off of when I was going to culinary school and working part time. This is one of my favorite recipes, but it's not my own. Alter however you wish as chili is very malleable like curry.
Recipe retrieved Septermber 16, 2010 from http://allrecipes.com/Recipe/Boilermaker-Tailgate-Chili/Detail.aspx
Chili is fairly inexpensive to make and lasts for so many servings, so it was basically what I lived off of when I was going to culinary school and working part time. This is one of my favorite recipes, but it's not my own. Alter however you wish as chili is very malleable like curry.
- 2 pounds ground beef chuck
- 1 pound bulk Italian sausage
- 3 (15 ounce) cans chili beans, drained
- 1 (15 ounce) can chili beans in spicy sauce
- 2 (28 ounce) cans diced tomatoes with juice
- 1 (6 ounce) can tomato paste
- 1 large yellow onion, chopped
- 3 stalks celery, chopped
- 1 green bell pepper, seeded and chopped
- 1 red bell pepper, seeded and chopped
- 2 green chile peppers, seeded and chopped
- 1 tablespoon bacon bits
- 4 cubes beef bouillon
- 1/2 cup beer
- 1/4 cup chili powder
- 1 tablespoon Worcestershire sauce
- 1 tablespoon minced garlic
- 1 tablespoon dried oregano
- 2 teaspoons ground cumin
- 2 teaspoons hot pepper sauce (e.g. Tabasco™)
- 1 teaspoon dried basil
- 1 teaspoon salt
- 1 teaspoon ground black pepper
- 1 teaspoon cayenne pepper
- 1 teaspoon paprika
- 1 teaspoon white sugar
- 1 (10.5 ounce) bag corn chips such as Fritos®
- 1 (8 ounce) package shredded Cheddar cheese
- Heat a large stock pot over medium-high heat. Crumble the ground chuck and sausage into the hot pan, and cook until evenly browned. Drain off excess grease.
- Pour in the chili beans, spicy chili beans, diced tomatoes and tomato paste. Add the onion, celery, green and red bell peppers, chile peppers, bacon bits, bouillon, and beer. Season with chili powder, Worcestershire sauce, garlic, oregano, cumin, hot pepper sauce, basil, salt, pepper, cayenne, paprika, and sugar. Stir to blend, then cover and simmer over low heat for at least 2 hours, stirring occasionally.
- After 2 hours, taste, and adjust salt, pepper, and chili powder if necessary. The longer the chili simmers, the better it will taste. Remove from heat and serve, or refrigerate, and serve the next day.
- To serve, ladle into bowls, and top with corn chips and shredded Cheddar cheese.
Recipe retrieved Septermber 16, 2010 from http://allrecipes.com/Recipe/Boilermaker-Tailgate-Chili/Detail.aspx
Subscribe to:
Posts (Atom)